
Die-cut vs kiss-cut labels: what's the difference?
Same artwork, same material, one blade-depth decision — and it determines whether you get a roll an applicator can run at full speed or a stack of individual stickers. Here's how the two cuts work and which one your job needs.
THE SHORT ANSWER
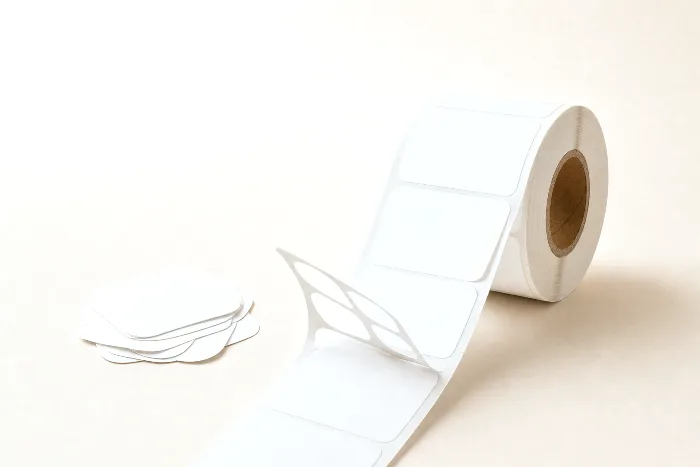
A kiss cut slices through the label face stock and adhesive but leaves the release liner intact. A die cut goes all the way through — face, adhesive, and liner — producing an individual finished piece. The shape can be identical; the difference is how deep the blade goes:
- Kiss-cut — labels stay on a continuous liner: rolls and sheets, ready to peel
- Die-cut — each piece is cut to its final outline, liner and all: individual stickers
- Applicators need kiss-cut rolls — the intact liner is what carries labels through the machine
- Both support custom shapes — the cut type doesn't limit the outline
The one-sentence answer
Kiss-cutting cuts through the face material but not the liner; die-cutting cuts through everything. That's the entire distinction. A pressure-sensitive label is a sandwich — printable face stock, adhesive, and a silicone-coated release liner. A kiss cut is calibrated to sever the top two layers and stop at the liner, so the label sits on an unbroken carrier and peels off when you want it. A die cut punches through the whole sandwich, so what comes out is a free-standing piece in the exact shape of the design.
Everything else people associate with the two terms — rolls versus singles, machine versus hand application, how the waste is removed — follows from that one difference in blade depth. This article is part of the complete guide to label printing, which covers the rest of the label spec: materials, sizes, unwind directions, and finishes.
How each cut is made
Both cuts come off the same families of equipment; the setup differs, not the machine.
- Rotary dies. The workhorse of label converting. A cylindrical die — either a solid engraved cylinder or a thin flexible die wrapped around a magnetic cylinder — rotates against a hardened anvil roll as the printed web passes between them. For a kiss cut, the blade-to-anvil gap is set to the liner thickness, so the blade stops exactly at the silicone layer; set the gap to zero and the same die cuts clean through. Rotary cutting runs at full press speed, which is why virtually all roll labels are cut this way.
- Flatbed and semi-rotary dies. A flat steel-rule or etched die stamps down on the web or sheet. Slower than full rotary but cheaper to tool, and common on digital label presses where run lengths are short and the die needs to match frequently changing jobs.
- Laser and knife (digital) cutting. No physical die at all. A digitally guided laser or drag knife follows the cut path straight from the file. Depth is controlled by power or blade extension, so the same machine kiss-cuts or die-cuts on command. It's slower per piece than a rotary die, but there is no tooling to make — which changes the economics of short runs and shape changes.
The kiss cut is the harder trick. Too deep and the liner is scored — the web loses strength and can snap under tension on press or applicator. Too shallow and the adhesive isn't fully severed, so labels tear or lift the matrix with them when peeled. Converters strike the die depth at the start of each run for exactly this reason.
Which format uses which cut
The format you order dictates the cut. Here's the map:
| Format | How it's cut | Best for |
|---|---|---|
| Roll labels | Kiss-cut; matrix stripped; labels remain on a continuous liner wound on a core | Automatic application on bottles, jars, pouches, boxes — any volume beyond hand-labeling |
| Sheet labels | Kiss-cut on a liner sheet; sheet edges die-cut to final size | Hand application in small batches; office laser/inkjet printing; short-run variable jobs |
| Individual die-cut stickers | Die-cut through face and liner to the final outline | Retail stickers, promo giveaways, pack-ins, resale — anywhere each piece is handled singly |
| Transfer / decal formats | Kiss-cut, hand- or machine-weeded, then pre-masked with transfer tape | Multi-element vinyl graphics for windows, equipment, and vehicles that must apply as one aligned unit |
Note the pattern: everything that stays on a liner is kiss-cut. Die-cutting only appears where each piece is handled individually — and even a die-cut sticker usually gets a kiss cut too, in the form of a crack-back slit in its liner so the backing peels easily.
Matrix stripping: where the waste web goes
Kiss-cutting creates a byproduct: the matrix (also called the waste web or skeleton) — the lattice of face stock left between and around the labels after the shapes are cut. On a converting line, the matrix is stripped in-line: it peels away from the liner immediately after the die station and rewinds onto a waste roll, leaving only the finished labels on the carrier.
Matrix stripping is where label shapes earn or lose their manufacturability:
- Rounded corners strip cleanly. The matrix flows around a radius. Sharp external points snag and can lift the label off the liner with the waste.
- Narrow inside notches and slivers tear. A thin bridge of matrix between two close cut lines has almost no strength; when it tears mid-run, the press stops.
- Tiny gaps between labels starve the matrix. Labels are spaced on the web partly so the waste lattice stays continuous and strong enough to pull away at speed.
When a converter asks you to round a corner or widen a notch, this is usually why — the change is about keeping the waste web intact at press speed, not about your design. On decal work the same operation is done deliberately and selectively by hand, where it's called weeding: the unwanted vinyl is picked out, and what remains is the graphic.
Why applicators need kiss-cut rolls
Automatic label applicators are the reason kiss-cutting exists. An applicator works by pulling the liner around a sharp edge called a peel plate (or peel beak). The stiff liner makes the hairpin turn; the stiffer label can't follow it, so the label's leading edge lifts off and presents itself to the passing product, where a wipe-down brush, air blast, or tamp pad applies it. The machine senses the gap between labels (or a printed eye mark) to time each dispense.
Every part of that mechanism depends on the kiss cut:
- The intact liner is the conveyor — it carries labels under tension through the machine. A nicked liner breaks, and a break means threading the web again while the line waits.
- The stripped matrix means only label-then-gap passes the sensor, so registration stays locked.
- The consistent gap and roll direction put every label in the same position and orientation — which is why unwind direction is part of the label spec (see roll direction and unwind positions).
Die-cut singles have no carrier, so no applicator can feed them. If a product will ever be labeled by machine — even a rented semi-automatic bottle labeler — the order must be kiss-cut rolls. This is the single most consequential difference between the two cuts for a growing brand.
Edge quality and corner radius
The cut also shapes how the label survives in the field.
- Corner radius. Square corners are the first thing to catch — on a sleeve, a pocket, a crate — and a lifted corner becomes a peeled label. A modest radius (about 3 mm / 0.125 in is typical) resists lifting, strips cleaner from the matrix, and is kinder to the die. Most label templates default to rounded corners for all three reasons.
- Blade vs laser edges. A well-struck steel die leaves a clean mechanical edge. Laser cutting melts its way through, which on some film stocks slightly seals the cut edge — but can discolor the edge of paper stocks. Neither is universally better; it's a stock-by-stock conversation with the converter.
- Adhesive ooze. Aggressive adhesives can bleed slightly at the cut edge and pick up dust. It's mostly an adhesive-selection issue, but a clean, correctly struck kiss cut minimizes it.
- Fine detail. Tiny floating elements and hairline cutouts are hard to hold with any die and hard to weed by hand. Intricate outlines suit digital cutting — at a per-piece speed cost.
Custom shapes and die charges
Both cuts take custom shapes; the question is what the shape costs to tool. A rotary or flatbed die is a physical object made for your outline, and it typically carries a one-time die charge on the first order. A few qualitative rules govern how that plays out:
- Standard shapes are usually free. Converters keep libraries of stock dies in common rectangles, circles, and ovals. Landing on an existing size avoids the charge entirely.
- Flexible dies cost less than solid engraved cylinders — they're thin plates rather than machined tools — which is why they dominate short- and mid-run label work.
- A die is reusable. The charge is paid once; reorders in the same shape don't pay it again. Changing the size or outline means a new die.
- Digital cutting has no die charge at all — the trade is per-piece speed. For short runs and frequent shape changes it often wins; at volume, the rotary die pays for itself quickly.
Die charges are one member of a family of one-time tooling costs — printing plates are the other big one. How they're structured and when they recur is covered in our guide to printing plates and tooling costs.
When to pick which
The decision usually makes itself once you know how the label will be applied:
- Product labeling at any real volume → kiss-cut rolls. Applicators require them, and even hand-labeling goes faster peeling from a roll.
- Small batches, mixed designs, desktop printing → kiss-cut sheets. Easy to store, easy to run through an office printer, easy to hand-apply.
- Stickers as the product → die-cut singles. When each piece is sold, gifted, or packed individually, the finished die-cut piece is the deliverable.
- Large multi-part graphics → kiss-cut transfer format. Weeded vinyl on a carrier with transfer tape keeps every element aligned during application.
If a job needs both — roll labels for the bottling line and matching die-cut stickers for the launch box — treat them as two line items: they share artwork, not tooling.
How PackOS reads the cut from your artwork
In a print-ready label file, the cut is data: a vector path on a named spot color or layer (commonly CutContour, Thru-cut, or a dieline separation). When you upload label artwork, PackOS detects that path, separates it from the printed graphics, and measures the real shape — dimensions, corner radius, and gap requirements. From there the format follows: a roll spec with unwind position and labels-across, a sheet layout, or a die-cut single. If the file has no cut path at all, PackOS reconstructs one from the artwork boundary and flags it for your confirmation. You can see the detection pipeline on the technology page, or drop a real label file into Quick Quote and watch it read the cut.
Frequently asked questions
Are kiss-cut stickers lower quality than die-cut stickers?
No. The face material, print, and finished shape can be identical — the only difference is that a kiss-cut sticker peels from a larger liner while a die-cut sticker is trimmed to its outline, backing and all. Quality comes from the stock, the print, and the laminate, not from the cut type.
Can a kiss-cut label have a custom shape?
Yes. Kiss-cutting supports any outline a die or digital cutter can follow — the cut shape is independent of cut depth. Custom-shaped roll labels are kiss-cut every day; the liner simply stays intact underneath the custom shape.
What is matrix stripping?
Matrix stripping is removing the waste web — the lattice of face stock left between labels after kiss-cutting. On a converting line it is pulled off in-line and rewound as waste, leaving only the finished labels on the liner. Shapes with rounded corners and adequate spacing strip more reliably at speed.
Which is cheaper, die-cut or kiss-cut?
For product labeling, kiss-cut rolls are generally the more economical format because they run at full converting speed and apply by machine. Individual die-cut stickers add handling — each piece is cut through and often packed singly — so they typically cost more per piece. Actual pricing depends on quantity, size, material, and tooling, which is what an instant quote resolves.
Why does my label supplier want rounded corners?
Rounded corners strip cleanly from the waste matrix at press speed, resist edge lifting once applied, and wear better than sharp points. A radius of roughly 3 mm (0.125 inch) is a typical default. Sharp external corners can snag the matrix and lift labels off the liner during converting.